
If you’re reading this, you are probably wondering how to start a blog. If so, you’re in the right place! In this post, I have put together a step-by-step guide to starting your own blog online, with detailed instructions, and illustrations.
How do I start a blog? I have been blogging for many years. I know the ins and outs of what to do and, more importantly, what not to do. If you follow this how-to guide step-by-step, you will be on your way to starting a successful blog in no time. I only wish I had a resource like this when I started blogging years ago.
How do you start a blog? Starting a blog isn’t something to be afraid of, and you don’t need to be a computer programmer, a Webmaster, or an HTML guru to do it.
That said, there are some basic dos and don’ts to consider when setting up any new blog page that everyone should know. You don’t want to make any beginner’s mistakes that could otherwise be avoided. Even small mistakes could cost you readers (or revenue) in the future, so it’s best to do things the right way from the very beginning.
That’s why I created this step-by-step guide to creating your own blog. I want to help bloggers get to blogging—and skip the boring setup process (or at least expedite it).
If you follow everything outlined below, you will be all set to start your own successful blog online.
Let’s get started.
How to Start a Blog for Beginners
Step by step guide to starting a blog: Setting up a blog is much easier (and cheaper) than it used to be, and, if you follow all of these steps, you should be up and running in under 30 minutes.
First Steps to Starting a Blog
- Get Your Blog Online
- Pick Your Domain Name
- Choose/Install a Blogging Platform
- Learn the Basics of WordPress
- Customizing Your Site
Should I Start a Blog?
How to become a blogger: Blogging is an incredibly popular activity online, and there are countless reasons individuals decide to start their own.
Here are a few common reasons,
- Work from home: Blogging allows you to work on your own schedule, to work from wherever you want, and to be your own boss. That said, making a full-time income from blogging is hard work, but for most people, it is a labor of love.
- Become a published author: Blogging is a great pathway to publishing your own book because it allows you to gather readers as your hone your craft. Plus, it’s obviously easier to sell books when you already have a loyal audience.
- Build up your existing brand: If you are a business owner, a blog is a great way to build and leverage your brand. Blogging allows you to reach large, targeted audiences without expensive advertising.
- As a hobby: You might just choose to start a blog simply as a hobby. If you love writing and want to share your story and thoughts with others, a blog is a great place to start.
These are just a few reasons why people choose to start blogs. If you fit into any of these, a blog is probably the right choice for you.
Step 1: Get Your Blog Hosted Online
How do you start your own blog? The first step to setting up your own blog is to get it online. The way you do this is through a hosting account (We recommend Bluehost for your hosting.).
A hosting account is where all of back-end information for your blog is stored. It’s the boring server side of the website that you, hopefully, won’t be accessing after things are set up. Once it’s up and running, you will be using a content management system (like WordPress) to make regular changes to your blog (more on that below).
The best way to think about it is that WordPress makes your blog look like a blog and your hosting account makes it live and active for everyone to see.
All that said, getting a hosting plan for your blog is easy, and I will walk you step-by-step through the process below.
Hosting Sites for Blogs
What is the best blog hosting site? Bluehost is one of the most popular hosting accounts for WordPress blogs. They offer 24/7 support, which is a huge plus. If, for whatever reason, your blog is down, you want to be able to get a hold of someone anytime of the day or night, so it’s important for your hosting company to have 24/7 active support available.
Installing WordPress on Bluehost is incredibly simple: it’s literally one click and that’s it! The simplicity of installation is a huge bonus because no one wants to mess around with the complexities of back-end servers.
Lastly, Bluehost has a few great sign-up bonuses that are huge when you’re just starting off. First, they offer free SSL-certificates for your website, which helps to better protect your website and data and can help you get more web traffic in search results. Some companies charge as much as $10 a month for this. Second, you can actually register your domain name for free with Bluehost.
To get your blog started with Bluehost, click here. Simply click the green “Get Started” icon, and you’ll see that Bluehost offers a few different plans.
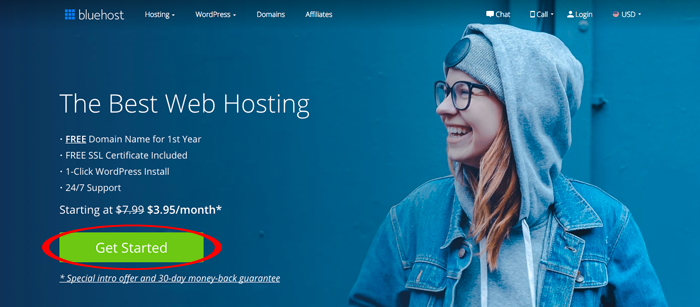
Each of their four primary hosting plans will be fine for you when you’re just starting off, but I would advice you to get the “Choice Plus” plan. It’s just $2 more per month than their basic plan, but it has a few features that you’ll want.
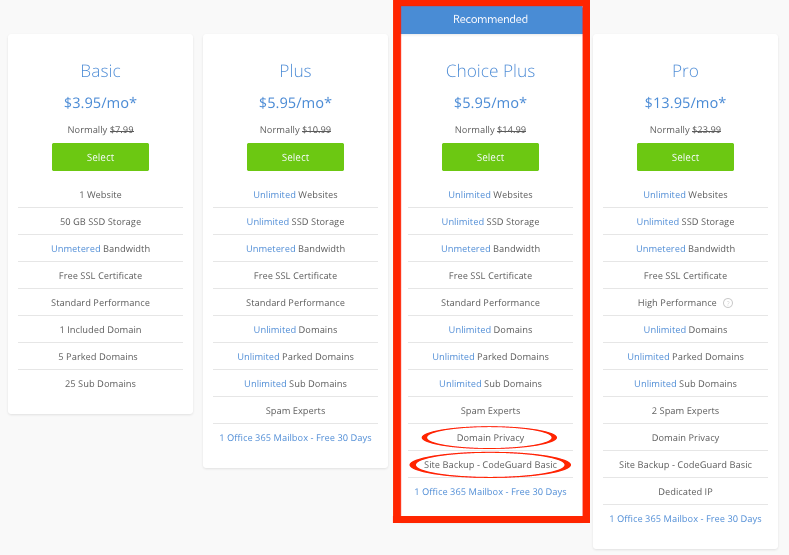
First, the “Choice Plus” plan comes with free domain privacy. This will keep your personal information, such as name, address, and phone number private. You can choose to add on domain privacy on the basic plan for around $1 per month, but then you might as well just get the “Choice Plus” plan to get the other features.
The other features the “Choice Plus” plan comes with are free website backups, which you can set to daily, weekly, or monthly backups. So if anything happens to your site, whether it gets hacked or you delete something on accident, you will have access to free site backups. Lastly, it also comes with the ability to add multiple websites. The basic plan only allows one website to be installed, so if you ever think you will ever want another domain in the future, it’s definitely worth the extra $2.
Step 2: Pick Your Domain Name
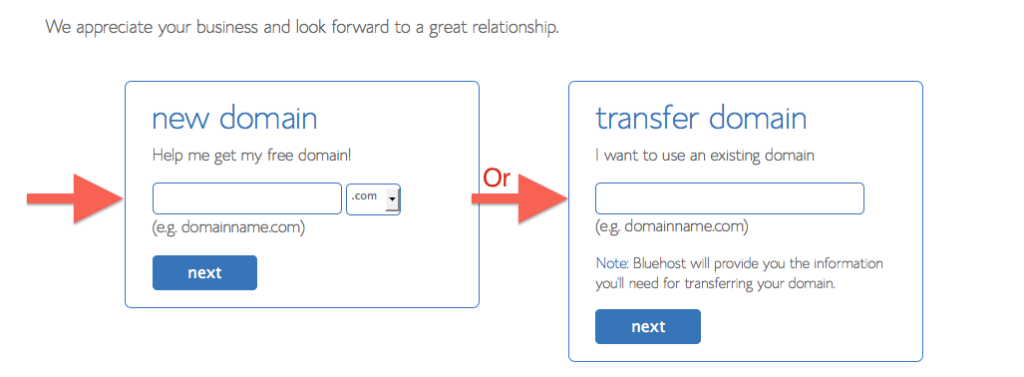
Creating your Bluehost account: Now that you have selected your plan, it’s time to secure your domain name (Step 2 from our outline). If you already have purchased a domain name elsewhere, no problem, simply type it in under the “Use a domain you own” section.
If you still need to buy one, you can keep things simple by securing it directly through Bluehost—plus you’ll get it for free! Under the “Create a new domain” section, just type in the domain name that you want.
If you’re not sure of the domain name you want quite yet, or the one you want is taken, no problem. Just hover your mouse over the back button and wait for the prompt to choose your free domain later.

Bluehost will credit your account the price of a new domain, and you will be able to redeem it at a later date. This way, you’ll be able to take your time thinking of the perfect domain name but you’ll still be able to take advantage of the free credit.
I’ll run through the rest of this how-to blogging guide as if you’re starting a new domain, but if you already own a name, the process is nearly identical, so you won’t get lost in the process.
The next few steps are just like setting up any other account.
- Enter contact information.
- Choose length of plan.
- Skip domain extras.
- Enter billing information.
- Read through and confirm terms of service.

Don’t overpay on your plan: You’ll get the best price on hosting by selecting the longest billing cycle. So in order to get the $5.95 per month introductory offer, you’ll need to choose the 36-month price.
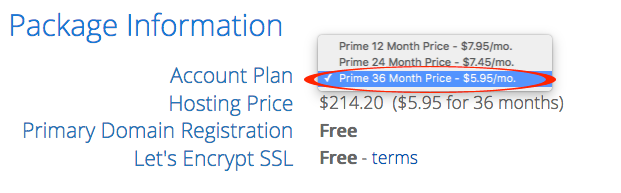
If it’s in your budget, you should definitely choose this option because it gives you 3 straight years of worry-free hosting—plus it’s the cheapest monthly rate. Selecting the 36-month price basically gives you a full year’s worth of hosting for free.
Skip all of the add-ons and upcharges. You’ll see boxes to check for various upcharges or free trials, such as SiteLock security or Microsoft Office mail. Leave all of these unchecked. None of them are necessary, and they all just add to your monthly bill.
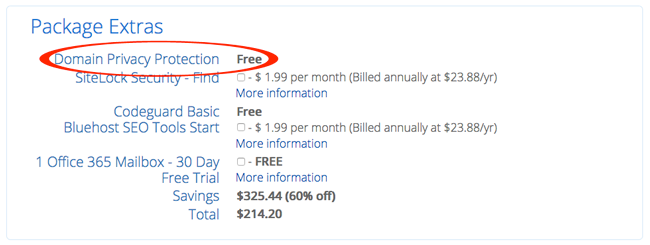
If you signed up for the “Choice Plus” plan, you will receive free domain privacy (as we mentioned above). If you chose either the basic or plus plan, you will see this option as add-on for $1 per month. This is the one option that I would recommend getting, as it keeps your information private. The same goes for the CodeGuard website backups.
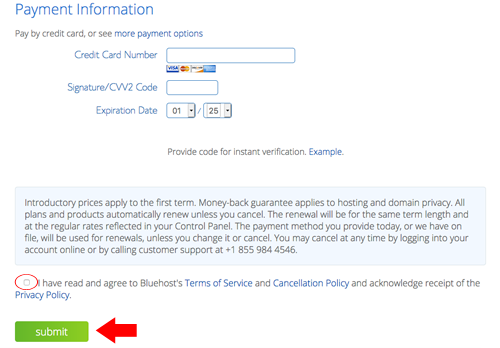
Lastly, enter your billing information and make sure you read and agree to the terms of service. And don’t forget, you have a 30-day money back guarantee on whatever you buy, so there’s no risk if you need to change something.
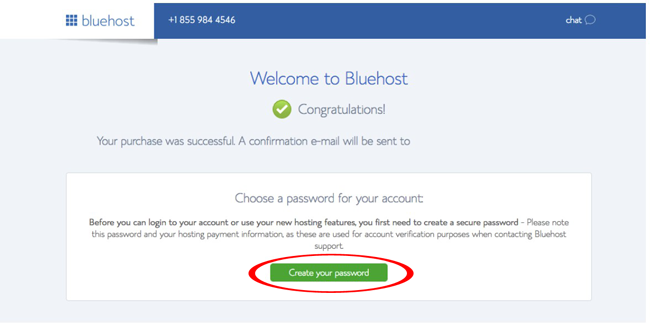
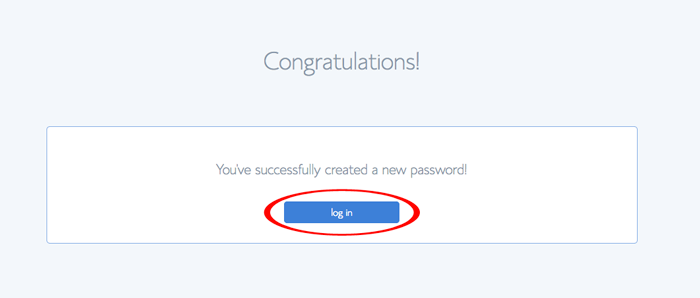
Choose a password: After your purchase is complete, you’ll be directed toward a “Congratulations!” page that confirms your purchase. This is where you will set the password for your Bluehost account. This won’t be the password for you WordPress website, but, instead, for your Bluehost hosting account itself.
Step 3: Installing WordPress on Your Host
There are many different blogging platforms available today, but I’m going to save you a lot of time and headache and just say: WordPress is the only one worth using.
WordPress is by far the biggest content management system. Both large and small websites use WordPress; I use WordPress exclusively for its ease of use and its huge platform. There are quite literally thousands of free themes that you can use to design your site and thousands more plugins that you can use to customize it.
It’s incredibly simple to use, and it’s completely free, so it’s sort of a no-brainer.
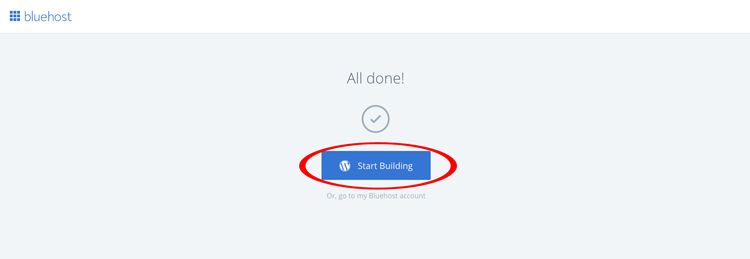
And the best part of Bluehost is that WordPress installs automatically! When you log in to your account, Bluehost automatically installs WordPress on the site. It’s that simple.
Click “log in” and boom! WordPress is now installed!
Bluehost will show you a few free themes for your new blog. There are literally thousands of WordPress themes you can choose from, so odds are you will not settle on one of these few themes, as they are just a small sample of popular ones.

Pick whichever one you like the best as a holdover until you find something you like better later. We’ll go over how to change your theme below.
Now you are ready to start editing your WordPress account and you can finally create your own blog page.
Step 4: Learn the Basics of WordPress
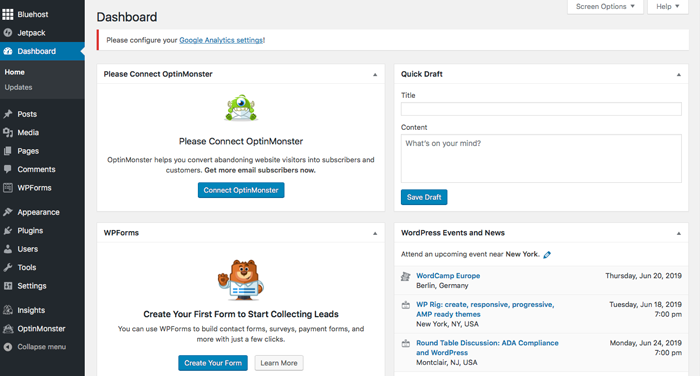
After you pick your initial theme, you will be directed to your WordPress Dashboard. Your dashboard is the central hub of your WordPress blog. It is what you will see each time you log in, and it is how you will navigate the back-end of your website.
You’ll first see a page that looks like this:
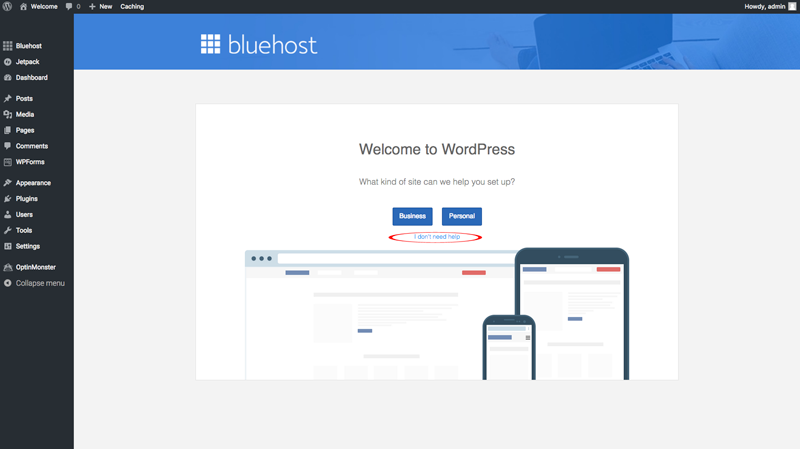
In my opinion, it’s best to ignore the “Business” and “Personal” options and, instead, choose the “I don’t need help” selection. This way, you can customize the site on your own. Don’t worry; we will go through all of the settings below.
Step 5: Configuring Your WordPress Account
Now that our hosting account is active and our domain is live, we can get to configuring our WordPress account, which will affect the front-facing website that everyone will actually see.
The first thing you will want to do is tidy up your dashboard. As a brand new site, your dashboard will be littered with updates or possible add-ons that make it distracting to get anything done.
Go to your WordPress dashboard (different from the Bluehost dashboard), and it will probably look something like this. Exit out of all of this clutter by clicking the small “x’s” on each box.
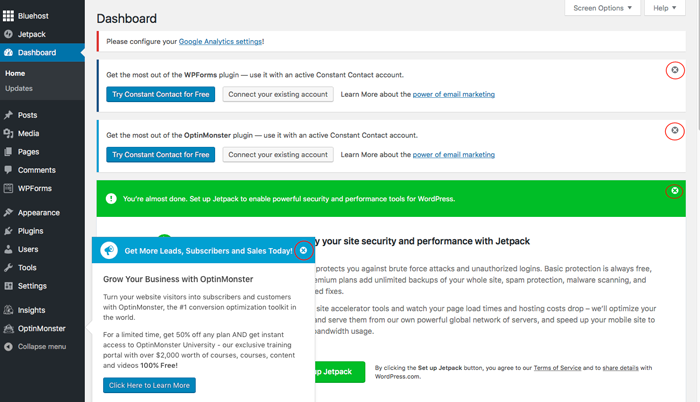
Most of this is unnecessary, but if you need any of it later, you can add it then. Now that you have all of that out of the way, your dashboard should look something like this:
The first thing I like to do from here is remove any of the unnecessary plugins that come preinstalled on the domain. If you run too many plugins, your site can run slowly, making it harder for people to enjoy your site. For that reason, they should be used sparingly and with a purpose.
Plus, when you’re first starting your blog, you won’t need very many plugins. Your basic plugin page will look something like this:
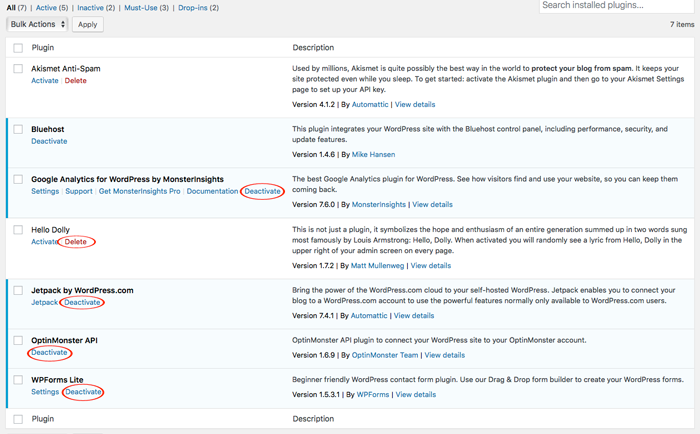
Personally, I always deactivate and delete the following plugins, Google Analytics for WordPress by MonderInsights, Hello Dolly, Jetpack by WordPress.com, OptinMonster API, and WPForms Lite. I find that some of these aren’t helpful (Hello Dolly and Jetpack) and others can be replaced by better plugins (MonsterInsights and WPForms).
If, however, you already have an OptinMonster account, you will want to keep their plugin. We cover OptinMonster in another post.
After you have deleted the plugins mentioned above, you can get to the plugins that we actually want to use. Akismet Anti-Spam is an excellent plugin that helps eliminate comment spam on your blogs. Activate this plugin and set up an account using the setting page.
Next, you will want to click on the “Add New” button and search for “Yoast.”
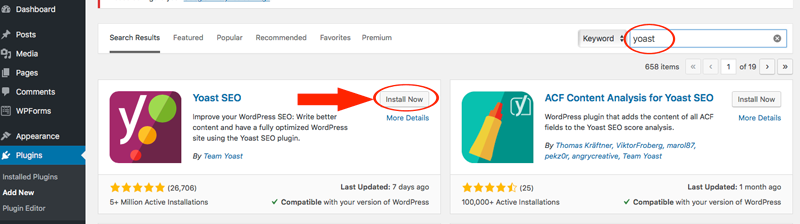
The Yoast SEO plugin is an essential plugin for making your new blog search engine friendly. It will submit sitemaps to Google for you that allows your website to get put into Google search and will help you get natural, organic traffic to your blog. Once you locate the plugin, just click on “Install Now” and “Activate” and you should be set.
The next plugin that you will want to install is my favorite Google Analytics plugin: simply called “Google Analytics by ShareThis.”
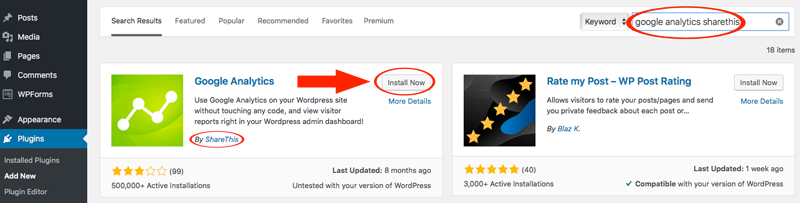
This plugin easily connects your Google Analytics profile to your website, so you can see how many visitors you are getting to your blog. After you install and activate this plugin, you can connect your Google profile using the “Settings” feature on your sidebar. If you don’t have a Google Analytics profile yet, don’t worry. You can skip this step and do it later. We cover setting up Google Analytics in another post.

The last basic plugin I install is the WordPress “Classic Editor.” Around a year ago or so, WordPress changed up its editor that you use to create your blog posts. Call me old-fashioned, but I despise it, and I much prefer the classic editor.

Luckily, I am not the only one who feels this way, and someone quickly developed a plugin that brings back the classic editor (and over 5 million websites use it).
Step 6: Customize Your Blog
Now that the boring stuff is out of the way, you can actually get to customizing your blog—and creating content that people will actually see.
Your first step here is to pick out a theme that you like. If you like the theme you picked out from earlier, you’re already done, but at least take a look through the inventory of free themes available.
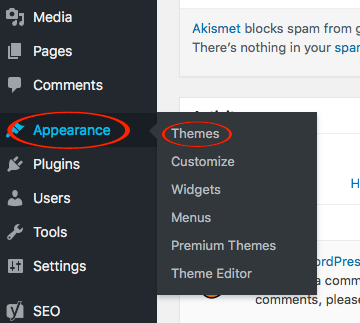
Under the “Appearance” section, click on themes. From there, click “Add New Theme” and you can literally scroll through hundreds and hundreds of free themes and select the one that you like best for your blog.
All you need to do it click “Install” and then “Activate,” and the theme will be live on your website. If you want to change it again in the future, just repeat these steps.
Step 6.5: Building Out Your Blog
Now that your blog is live for everyone to see, it’s time to start building it out and publishing some basic blog pages. Most blog will have some variation of the following pages, so these might be a good place for you to start.
Basic Blog Pages:
- Homepage: This will develop over time and as your blog gets bigger, but it is a good place to welcome readers and outline the various parts of your blog.
- About Page: Here is where you can share your story and explain in more detail what your blog is all about.
- Contact Page: If you want your readers to be able to contact you, you can create a basic contact page.
Once you have these basic pages completed, it’s a good idea to publish a few blog posts on the website that readers can see once they go to the site. If you just have a contact page and about page, there isn’t much for your visitors to read.
And with that, congratulations! You’re up and blogging!
Contents